
How to create a ChatGPT application using Next.js and the OpenAI API.
Build a ChatGPT application with Next.js, TypeScript, and TailwindCSS.
Prerequisites
- Node.js and npm installed on your machine
- A basic understanding of React and TypeScript
- An OpenAI API key — you can sign up for an account and generate an API key from the OpenAI website.
You can view my complete project by visiting TeamSmart.AI. It's a Chrome extension that lets you choose from a variety of AI assistants to aid you with your everyday tasks.
What we will build
Following this tutorial, we will use the OpenAI API to create a simple chat application like ChatGPT.
Step 1: Setting up the project
We will use the Next.js Starter Kit from Apideck to set up our project. It comes with TypeScript, TailwindCSS, and the Apideck Components library pre-installed.
- Create a new project using the command line:
yarn create-next-app --example https://github.com/apideck-io/next-starter-kit
- Choose your project name and navigate to your new folder. Inside, create a
.env.localfile at the root of your project and add the following line (replacingYOUR_OPENAI_API_KEYwith your actual key):
OPENAI_API_KEY=YOUR_OPENAI_API_KEY
Step 2: Writing the API client
To not expose your OpenAI API key, we will create an API endpoint instead of making requests to the API directly from our browser. Follow these steps to set up your endpoint using a Next.js API route:
- Locate the pages folder of your project and create a new subfolder named
api. - Inside the
apifolder, create a new TypeScript file namedcreateMessage.ts - In the
createMessage.tsfile, we can either use the OpenAI SDK or issue an HTTP request to the OpenAI API to generate a new message for our “conversation” with the AI. We will use the direct API call in this tutorial.
Here is the code for our API route.
import { NextApiRequest, NextApiResponse } from 'next'

export default async function createMessage(
  req: NextApiRequest,
  res: NextApiResponse
) {
  const { messages } = req.body
  const apiKey = process.env.OPENAI_API_KEY
  const url = 'https://api.openai.com/v1/chat/completions'

  const body = JSON.stringify({
    messages,
    model: 'gpt-3.5-turbo',
    stream: false,
  })

  try {
    const response = await fetch(url, {
      method: 'POST',
      headers: {
        'Content-Type': 'application/json',
        Authorization: `Bearer ${apiKey}`,
      },
      body,
    })
    const data = await response.json()
    res.status(200).json({ data })
  } catch (error) {
    res.status(500).json({ error: error.message })
  }
}
For this example, we’re utilizing the gpt-3.5-turbo model, as it’s currently available at the time of writing. If you possess access to GPT-4, you can alter the value as necessary.
The messages value is an array that stores messages from our chat-based conversation with the AI. Each message contains both a role and content. The role can be either:
- system This is the initial prompt sent to the AI, which gives it instructions on how to behave. For example, you may use “You are ChatGPT, a language model trained by OpenAI.” or “You are a software engineer who develops software programs, web applications, and mobile applications using various programming languages and development tools.” Experimenting with different initial system messages can help you fine-tune the AI’s behavior.
- user This represents the user’s input. For example, the user could ask, “Can you provide a JavaScript function fetching the current weather?”
- assistant This is the AI’s response, which the API endpoint will return.
Step 3: Creating the messaging functions
Now that the endpoint is ready to interface with the AI, we can begin designing our user interface to facilitate interaction. To start, we’ll create the sendMessage function. Here’s how:
- Create a new file named
sendMessage.tsin theutilsfolder. - Add the following code to
sendMessage.ts:
import { ChatCompletionRequestMessage } from 'openai'

export const sendMessage = async (messages: ChatCompletionRequestMessage[]) => {
  try {
    const response = await fetch('/api/createMessage', {
      method: 'POST',
      headers: {
        'Content-Type': 'application/json',
      },
      body: JSON.stringify({ messages }),
    })

    return await response.json()
  } catch (error) {
    console.log(error)
  }
}
With this function in place, you can establish communication between the user interface and the AI via the API endpoint.
Now let’s setup the logic to create new messages inside a useMessages hook. Inside the utils folder, create a file named useMessages.ts and add the following code:
import { useToast } from '@apideck/components'
import { ChatCompletionRequestMessage } from 'openai'
import {
  ReactNode,
  createContext,
  useContext,
  useEffect,
  useState,
} from 'react'
import { sendMessage } from './sendMessage'

interface ContextProps {
  messages: ChatCompletionRequestMessage[]
  addMessage: (content: string) => Promise<void>
  isLoadingAnswer: boolean
}

const ChatsContext = createContext<Partial<ContextProps>>({})

export function MessagesProvider({ children }: { children: ReactNode }) {
  const { addToast } = useToast()
  const [messages, setMessages] = useState<ChatCompletionRequestMessage[]>([])
  const [isLoadingAnswer, setIsLoadingAnswer] = useState(false)

  useEffect(() => {
    const initializeChat = () => {
      const systemMessage: ChatCompletionRequestMessage = {
        role: 'system',
        content: 'You are ChatGPT, a large language model trained by OpenAI.',
      }
      const welcomeMessage: ChatCompletionRequestMessage = {
        role: 'assistant',
        content: 'Hi, How can I help you today?',
      }
      setMessages([systemMessage, welcomeMessage])
    }

    // When no messages are present, we initialize the chat the system message and the welcome message
    // We hide the system message from the user in the UI
    if (!messages?.length) {
      initializeChat()
    }
  }, [messages?.length, setMessages])

  const addMessage = async (content: string) => {
    setIsLoadingAnswer(true)
    try {
      const newMessage: ChatCompletionRequestMessage = {
        role: 'user',
        content,
      }
      const newMessages = [...messages, newMessage]

      // Add the user message to the state so we can see it immediately
      setMessages(newMessages)

      const { data } = await sendMessage(newMessages)
      const reply = data.choices[0].message

      // Add the assistant message to the state
      setMessages([...newMessages, reply])
    } catch (error) {
      // Show error when something goes wrong
      addToast({ title: 'An error occurred', type: 'error' })
    } finally {
      setIsLoadingAnswer(false)
    }
  }

  return (
    <ChatsContext.Provider value={{ messages, addMessage, isLoadingAnswer }}>
      {children}
    </ChatsContext.Provider>
  )
}

export const useMessages = () => {
  return useContext(ChatsContext) as ContextProps
}
Step 4: Implement the message UI components
Having set up our functions, we can now design UI components that will use these functions to create an interactive chat interface. Follow the steps below:
- Create a new file called
MessageForm.tsxin thecomponentsfolder of your project and add the following code:
import { Button, TextArea } from '@apideck/components'
import { useState } from 'react'
import { useMessages } from 'utils/useMessages'

const MessageForm = () => {
  const [content, setContent] = useState('')
  const { addMessage } = useMessages()

  const handleSubmit = async (e: any) => {
    e?.preventDefault()
    addMessage(content)
    setContent('')
  }

  return (
    <form
      className="relative mx-auto max-w-3xl rounded-t-xl"
      onSubmit={handleSubmit}
    >
      <div className=" supports-backdrop-blur:bg-white/95 h-[130px] rounded-t-xl border-t border-l border-r border-gray-200 border-gray-500/10 bg-white p-5 backdrop-blur dark:border-gray-50/[0.06]">
        <label htmlFor="content" className="sr-only">
          Your message
        </label>
        <TextArea
          name="content"
          placeholder="Enter your message here..."
          rows={3}
          value={content}
          autoFocus
          className="border-0 !p-3 text-gray-900 shadow-none ring-1 ring-gray-300/40 backdrop-blur focus:outline-none focus:ring-gray-300/80 dark:bg-gray-800/80 dark:text-white dark:placeholder-gray-400 dark:ring-0"
          onChange={(e: any) => setContent(e.target.value)}
        />
        <div className="absolute right-8 bottom-10">
          <div className="flex space-x-3">
            <Button className="" type="submit" size="small">
              Send
              <svg
                xmlns="http://www.w3.org/2000/svg"
                fill="none"
                viewBox="0 0 24 24"
                strokeWidth={1.5}
                stroke="currentColor"
                className="ml-1 h-4 w-4"
              >
                <path
                  strokeLinecap="round"
                  strokeLinejoin="round"
                  d="M6 12L3.269 3.126A59.768 59.768 0 0121.485 12 59.77 59.77 0 013.27 20.876L5.999 12zm0 0h7.5"
                />
              </svg>
            </Button>
          </div>
        </div>
      </div>
    </form>
  )
}

export default MessageForm
Now that we have set up the message UI components, we need to create the component to render the list of messages.
- Create a new file called
MessagesList.tsxin thecomponentsfolder and add the following code:
import { useMessages } from 'utils/useMessages'

const MessagesList = () => {
  const { messages, isLoadingAnswer } = useMessages()

  return (
    <div className="mx-auto max-w-3xl pt-8">
      {messages?.map((message, i) => {
        const isUser = message.role === 'user'
        if (message.role === 'system') return null
        return (
          <div
            id={`message-${i}`}
            className={`fade-up mb-4 flex ${
              isUser ? 'justify-end' : 'justify-start'
            } ${i === 1 ? 'max-w-md' : ''}`}
            key={message.content}
          >
            {!isUser && (
              <img
                src="https://www.teamsmart.ai/next-assets/team/ai.jpg"
                className="h-9 w-9 rounded-full"
                alt="avatar"
              />
            )}
            <div
              style={{ maxWidth: 'calc(100% - 45px)' }}
              className={`group relative rounded-lg px-3 py-2 ${
                isUser
                  ? 'from-primary-700 to-primary-600 mr-2 bg-gradient-to-br text-white'
                  : 'ml-2 bg-gray-200 text-gray-700 dark:bg-gray-800 dark:text-gray-200'
              }`}
            >
              {message.content.trim()}
            </div>
            {isUser && (
              <img
                src="https://www.teamsmart.ai/next-assets/profile-image.png"
                className="h-9 w-9 cursor-pointer rounded-full"
                alt="avatar"
              />
            )}
          </div>
        )
      })}
      {isLoadingAnswer && (
        <div className="mb-4 flex justify-start">
          <img
            src="https://www.teamsmart.ai/next-assets/team/ai.jpg"
            className="h-9 w-9 rounded-full"
            alt="avatar"
          />
          <div className="loader relative ml-2 flex items-center justify-between space-x-1.5 rounded-full bg-gray-200 p-2.5 px-4 dark:bg-gray-800">
            <span className="block h-3 w-3 rounded-full"></span>
            <span className="block h-3 w-3 rounded-full"></span>
            <span className="block h-3 w-3 rounded-full"></span>
          </div>
        </div>
      )}
    </div>
  )
}

export default MessagesList
We do not want to show the initial system message, so if the role is system we return null. Next, we adjust the styling of the messages based on if the role is either assisten or user.
While we are waiting for a response, we show a loading element. For this loader element to animate, we need to add some custom CSS. Inside the styles folder, create a globals.css file and add the following:
.loader span {
  animation-name: bounce;
  animation-duration: 1.5s;
  animation-iteration-count: infinite;
  animation-timing-function: ease-in-out;
}
.loader span:nth-child(2) {
  animation-delay: 50ms;
}
.loader span:nth-child(3) {
  animation-delay: 150ms;
}
Make sure to import the CSS file into your _app.tsx file:
import 'styles/globals.css'
import 'styles/tailwind.css'

import { ToastProvider } from '@apideck/components'
import { AppProps } from 'next/app'
export default function App({ Component, pageProps }: AppProps): JSX.Element {
  return (
    <ToastProvider>
      <Component {...pageProps} />
    </ToastProvider>
  )
}
- We can use our message UI components in our application now that we have built them. Locate the
pagesdirectory and openindex.tsx. Remove the boilerplate code in this file.
import Layout from 'components/Layout'
import MessageForm from 'components/MessageForm'
import MessagesList from 'components/MessageList'
import { NextPage } from 'next'
import { MessagesProvider } from 'utils/useMessages'

const IndexPage: NextPage = () => {
  return (
    <MessagesProvider>
      <Layout>
        <MessagesList />
        <div className="fixed bottom-0 right-0 left-0">
          <MessageForm />
        </div>
      </Layout>
    </MessagesProvider>
  )
}

export default IndexPage
We have wrapped our components with the MessageProvider so we can share the state between the components. We also added a container div to the MessageForm component, so it has a fixed position at the bottom of the page.
Step 5: Running the chat application
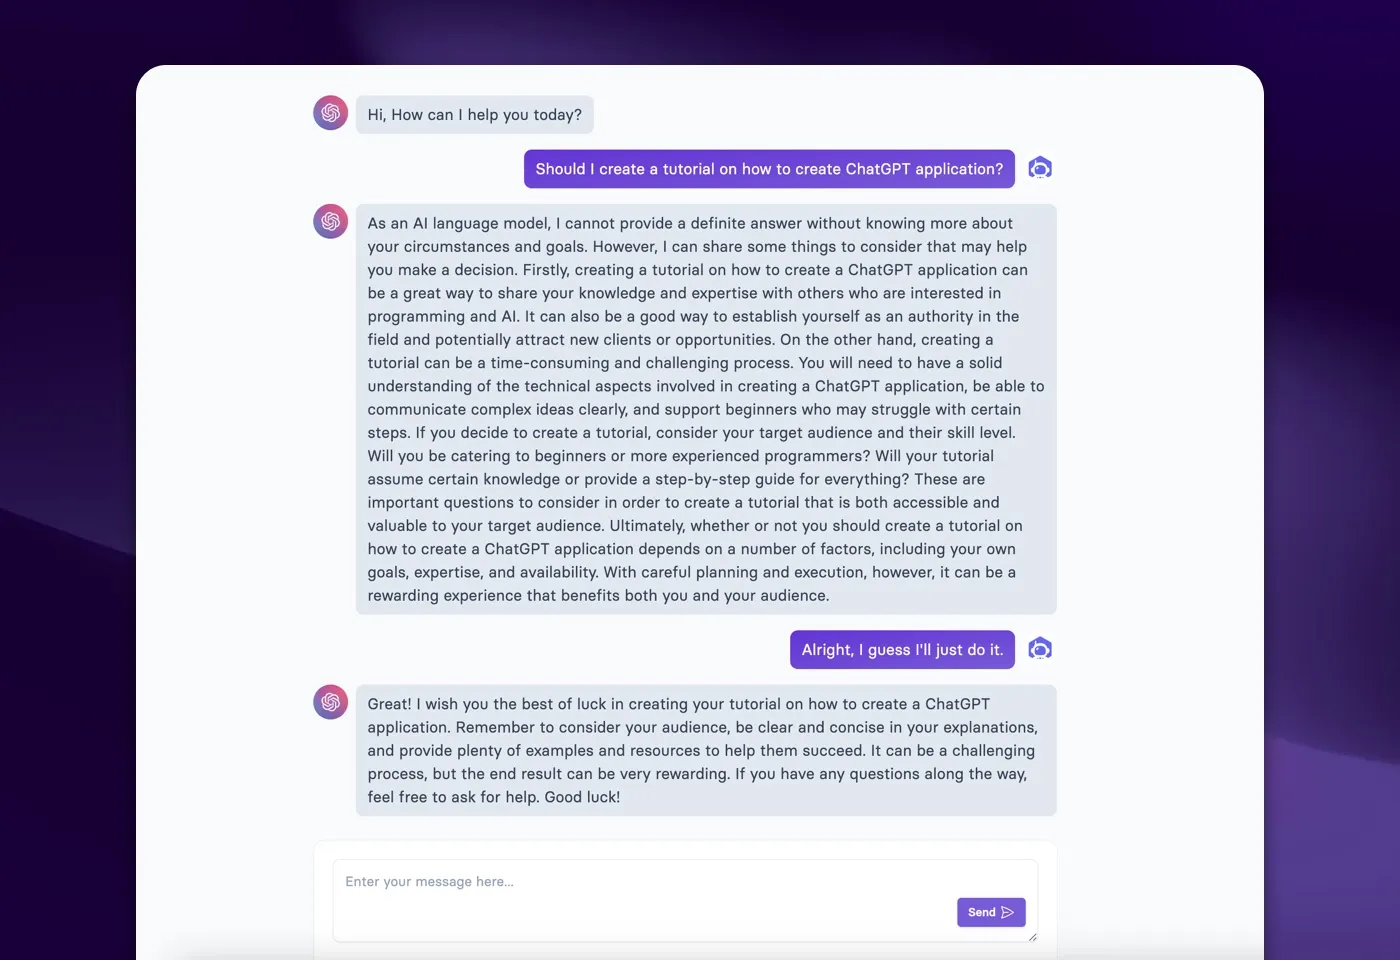
Nice job! We now reached the point where we could see our chat application in action. Here’s how you can test your ChatGPT application:
- Make sure your development server is running. (
yarn dev) - Navigate to the root URL of your application in your browser. (
localhost:3000) - You should see the UI rendered on the screen. Type a message in the text field at the bottom and hit Send. The AI chatbot will respond to your message.
You can now engage in a conversation with your AI chatbot! Feel free to experiment with different types of messages and see how the AI responds.
Final words
Thank you for reading! The complete source code can be found here.
If you found this tutorial useful, please connect with me on Twitter or visit my personal website at jakeprins.com.
In addition, be sure to check out TeamSmart AI for my complete ChatGPT application. It’s a Chrome extension that allows different AI team members to help you with your daily tasks.